Tuesday, December 11, 2012

And another pair...

Made with the same method as with the tutorial from the last post...  pyjama pants!  Used all the same technique, only I made the following changes:


  1. Only added 1 inch to the width instead of 2.  Since there is no side seam on PJ's, that part was skipped completely and just plain legs made.
  2. Left extra fabric at the top, to fold over and make a 'sleeve' for elastic at the waist.  No fly on this one, so no snaps needed.  I just sewed the U-shape in one shot for the front/crotch/back of the pants before making the elastic sleeve at the top.

Jeans/Pants Tutorial

This pants tutorial is NOT MINE.  Let me say that right up front.  The originator of this is Ragdoll, from Den of Angels.  The link to her original tutorial is http://www.denofangels.com/forums/showthread.php?231385-Anyone-Can-Sew-Jeans-Tutorial-(All-sizes-Pattern-Free) and if you have access, I recommend checking hers out!

I have put together this tutorial from my own images, for those who either do not have access to DoA for whatever reason, or for those who choose not to be on DoA.

Let's get started!

Things you will need:


  1. Fabric.  I recommend denim for jeans, but keep it thin.  Any other fabric can also be used, and you can choose to either finish the top via the tutorial, or hem it and insert elastic for PJ's or yoga pants.
  2. Thread.  Denim thread is best.  Gold denim thread is awesome for jeans, or there's many other colours you can use. 
  3. Snaps.  I prefer metal ones.  I've tried using the invisible plastic ones, but they just seem to have too many problems for my tastes.
  4. Scissors.
  5. Pins.
  6. Tape Measure.
  7. Iron + Ironing Board.  Not completely necessary, but it'll make the side seam and cuff hem SO much easier.
This is my doll volunteer, Takai, a 45cm Dollzone Mo MSD.  The fabric I'm using is white stretch denim, with white denim thread.  I show white buttons in this pic, but wound up using purple.  I also used a cotton fabric for the waistband instead of denim.  Makes it MUCH easier to keep the bulk down.  

 First thing you are going to want to do is measure your doll from the middle of the butt, to the middle of the front, at the widest point.  On some dolls, this will be the hips.  Shown here, I start at Takai's butt and go around to the front.

This is a measurement of 9cm.  

The other measurement to take is around the largest part of the thigh.  The reason for this is that a LOT of dolls are larger around the thigh than they are around the largest part of the hips.  Measure both.  Use the largest measurement.  Takai here has an 11cm measurement around his thigh, so we'll use that one.

Then measure the length of the jeans, from where you want them to start, to the bottom of the feet while standing.  26cm is Takai's measurement from the top of his hips, to the bottom of his feet.

After you get your measurements, you're going to want to add about 2 1/2 cm to the measurement from the width, and then add anywhere from 1 3/4cm to 5cm to the length.  It all depends on how long you want them.  Average is about 2.5cm (one inch).  I added the full 5 because I'm HORRIBLE at figuring out the crotch later and always wind up with muckwaders.  I also at some point in this, started using inches...  so for those using that measurement, add about 1 to the width and .5 - 2in to the length.

(Personal note:  I have trouble with seam allowances, so I usually add 2 inches to the width AND to the length.  It's worked out for me wonderfully and I wind up with snug jeans at the thighs.)

Cut out two rectangles of fabric to these measurements.  For Takai, I did 6 1/2 inches, by 11 inches.  It was supposed to be 12 inches in length, but I used the wrong side of my cutting board.  XD

Mark up about a half inch on a short end for the cuff hem, pin it and iron it into place.  Do the same for the second piece of fabric.  If you're using the finished edge of the fabric, like I am, you might need to use a bit more, as denim tends to have almost an inch worth of 'crap' at the bottom hem.  Especially stretch denim.

(Personal note:  I probably shouldn't have used white stretch denim and white thread, but these jeans were being made for someone who specifically requested those colours.)

See?  Half inch.

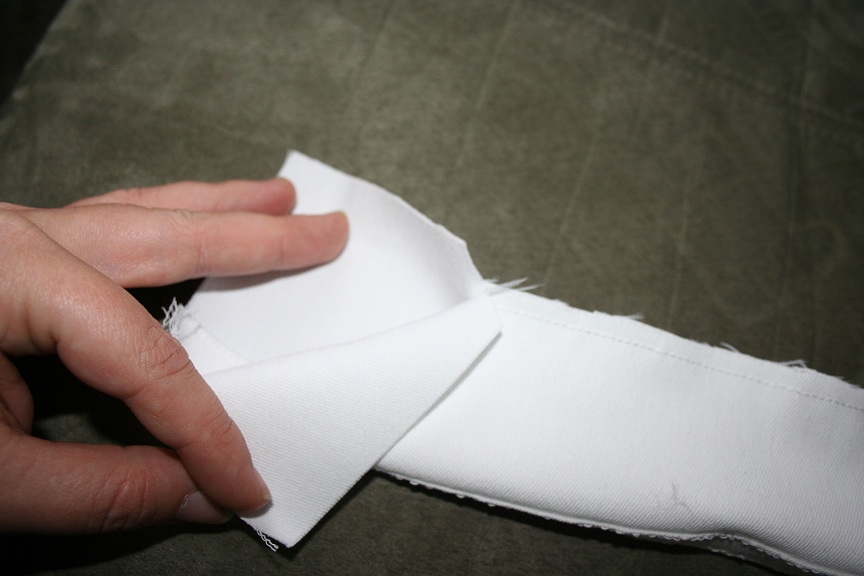
These steps may get confusing and I apologize if they're not clear in the pictures.  With the right side of your fabric facing up (the hem you ironed should be facing down), fold the fabric lengthwise, leaving about a half an inch of 'right side' visible at the edge.  You're ALMOST folding the pieces in half.  

Now flip the fabric over (Don't unfold it.) and fold the longer side towards the shorter side, leaving about a 1/2 inch overlap.  This will make a fold in the center of the fabric, with the two sides now being about even.  This is what gives the outer sides of the jeans their 'jeans' look.  Iron the hell out of those two folds and pin them in place.

Here is the fabric with the seam pinned and the hem pinned (because stretch denim doesn't like to lay flat).

Take one piece of the fabric and hold it up to your doll, right side out.  Make sure the bottoms are where you want the cuffs to be.  Then use your fingers to figure out where the crotch will be (you'll need to pinch it inward, or you'll wind up with hiphuggers) and slip a pin there to mark it.  You will also now need to figure out how you want your jeans to look.  If you want them to cut close to the leg, snip a wider strip from the cuff all the way up to your crotch marking.  I want straight leg pants for these, so I only cut a thin strip, the same width from the cuff to the crotch.

When you get to the crotch pin, snip at a slight angle towards the outer edge.  Unpin and unfold the fabric, and you should have something like what you see above.  Then cut the same strip out of the other leg.  (I usually just lay them over each other and cut that way).

Sewing time!  Take out the last pin at the bottom of the leg fold, so that you can have the entire cuff line flat to sew the hem.  In the pic above, you can see the ironed leg fold there.  Hem both legs.

Your finished hem, with the pin back in place to hold the leg fold.

Now sew down the leg seam, keeping the seam close to the fold visible on the outside of your jeans.  I ALWAYS do this with the right side facing up, makes it easier to keep it straight.

This is what it should look like when finished.  One seam, up against the edge of the fold.

(Personal note:  I usually put a second seam in, along the other side of the fold.  This gives the double-seam effect that you see on so many jeans.  Again, I apologize for the white thread. ><; )

Now that your hems and seams are done, fold your legs so that they are wrong-side out (you should be able to see the rough edge of your cuff hem), and pin them so that the lengths at the cuff are even and hopefully your crotch cuts match up.  If they're not perfect, don't sweat it.

Sew from the cuff upward, to just next to the crotch cut.  You do NOT want to sew the entire way up, and you do NOT want to sew the curve at the crotch.

This is how it should look if you open the top part.  Crotch curve opens up as well.

Now...  this part may get confusing.  Turn ONE pants leg right-side out.  So now you have one inside out and one right side out.  Put the right-side out leg inside the inside out leg.  Line them up so that the crotch part is even on both.  This is an image of the legs inside each other.

I use pins to make this easier.  This is the crotch part, this little curve.  You should have both pieces lined up together, and the pins are along the raw edges that will eventually be the front and back of the jeans.

Run it through the sewing machine, along that curve.  I apologize for not getting a pic of it, but it's a bit tricky with the fabric in the way.  Try and keep it as flat as you can, the crotch may bunch up.

Pull the inside pants leg out and turn your pants completely right-side out.  You should now have almost a pair of pants, with the top open on the front and back.

Put your pants on your doll.  There will be a natural 'lay' to the fabric against the butt.  One piece will lay flat against the butt, and the other will fold to start a seamline.  Keep your side seams at the sides of your doll, and adjust the lay of the pieces so that the fold falls right up along the butt crack.  Don't worry if the jeans are loose in the front, we'll deal with that later.  Just try to keep the side seams where they're supposed to be.  Pin the fold in place on the butt.

Sew a seamline from the crotch to the top, keeping the seam close to the edge of the fold.  

I missed a step here, and didn't get an image of the pants on the doll.  Put the pants back on your doll, and do the same as you did for the back.  This time, pull tight, as this is how your pants are going to fit.  So make them as snug as you like!  I usually fold over the bottom piece and hem it, as well as the top, for a finished look.  Make sure they overlap enough that you can add a snap or two later.

Sew the seams on both pieces.  For the top piece, I also sew up a little bit from the crotch, to either 1/3 or 1/2 of the way.  This keeps it from bagging open when the doll sits.  If you don't want to do this, you can also put a second snap at this point to keep it closed.

From the point where you stopped your sewn line from the previous step (or your snap point), sew the fly.  It should curve a bit, then go straight up.  This pic doesn't show it well, but you should have a pair of jeans you can look at.  

Almost done!  At this point, I realised I had left WAY too much fabric up top and wound up trimming it a bit.  Make sure the top of the fabric is right near where you want the jeans to end, as we will NOT be folding over the top.

For these jeans, I took a piece of fabric that will match the shirt to go with it.  I measure the waistline of the jeans, then cut out a piece of fabric that is a bit longer (to allow for the finished edge) and about 3 times as wide as you want the waistband to be.  Fold the fabric, lengthwise, into thirds and iron it flat.  Then take the fabric and use the open part of the fold to attach it to the waist of your jeans and pin it into place.  Leave about 1/2 inch to either end, snip off the extra.

This is what it should look like.  A double-thickness of fabric on the outside of the jeans, and the raw edge of the fabric on the inside.  

Now, take that 1/2 inch you left at the end and fold it inward, tucking it underneath the fabric that is laying on the inside of the waist.  It's hard to describe, but you'll basically flip the fabric in on itself, wrapping it around the edge of the denim and giving yourself a finished look to your waistline.

This is what it looks like from the inside of the waist.

Now, start from the top outer corner of your waistline.  This is the point you see at the bottom of the above picture.  Sew down to just before the point where your waist fabric ends and the denim begins.  Lift the foot on your sewing machine, turn it so that you can continue along the waistline, sewing the fabric to the denim.  Finish it up by turning again and sewing up to the outer point on the other end of the waistband.

After that, it's just a matter of adding a snap, and you're done!  If you chose to leave the front of the jeans open from the crotch to the waist, you'll likely need another snap halfway between the waistband and the crotch, to keep your boys from becoming flashers.  In this case, I also added a decorative button to the finished product.

The images were resized by the blog itself.  If you cannot click on them to see the full size pics, and have any questions or need clarification, please let me know!!

Happy sewing!
~Kit

Coming soon... Tutorials!

There will be tutorials coming soon, for making different doll clothing.  Most will be my own, but some will be reposts of other tutorials elsewhere.  I will be taking my own pictures, using my own descriptions, and providing links back to the originals, as well as full credit to those who originally designed the tutorials.  Today is sewing day, so I may as well take pics while I do it!  Most will be patternless, because that's just how I roll.

Tutorials upcoming:

Jeans/pants/shorts.

Peasant top.

Infinity dress.

T-shirts.

Sundress.

Hoodies.

Socks.

Arm/leg warmers.

Winter Fleece sets (Hat/mittens/scarf).

Keep checking back!
~Kit

Monday, November 5, 2012

Procrastinating? Meh, I'll do that tomorrow.

So I still haven't started on the sculpting of Kharis.  I have a plan, I know what I want... but I have this rather annoying habit of having something looking perfect in my head and when I try to put it on paper, my brain doesn't translate very well.  I'm terrified of this happening in clay, even though I know that I work better in clay than with pencil and paper.

I guess I just don't want to wind up wasting relatively expensive clay on a screwup.  So while I work up the nerve to do that, I've been instead working on clothes.  JoAnn's had a fabric sale, as did Hancock Fabrics in Harrisburg, and my friend Kim and I went and raided the places.

In the works:

Pyjamas set and shirt/pants for Hikaru (Kim's doll).  The shirt is in muslin right now, I found what was supposed to be a business-style button down shirt, but it turned out WAY too big, so it's going to have a Chinese style collar and sleeves instead.  I still think it looks nice.  I adjusted the pattern slightly to remove the extra fabric from the body.

Christmas dress for Sileas.  I have black faux suede/velvet, and a lovely Christmas plaid fabric, as well as lace trim and fur trim.  The dress will have a black 'velvet' capelet trimmed with fake fur, and a fur muff for her hands.  Need to find black, red or green maryjanes for her.

Hoodie for Takai/Amin.  They'll be sharing clothes.  I'm making a black knit hoodie with the fake fur trim.

I also need to sit down with Jami and work on the designs for Katsuro's outfits.  She has wonderful ideas but seems to be waffling about actually sketching them out.  If you want me to make it, I need to know what I'm making!  XD

And in addition to the Christmas dress, Sileas picked out a bunch of fabric to make her clothes and stuff with, including an adorable knit print fabric, some mouse-themed cotton, and really CUTE summer-ish dress fabric.  I keep telling her it's winter, and she refuses to believe it.

See you later!
Kit

Friday, October 26, 2012

ARGH.

I'm waffling again.  While I would love for this doll (from here and forever referred to as the Kharis doll.  A slightly different spelled name of the person I'm using as a body model) to be an MSD, I'm sitting here and wondering if I'm not biting off more than I can chew.

I'm looking at my YO-SD sized doll and I love her poseability and size, so perhaps going with an adult-proportioned YO-SD size will be best.   I'm going to model the body first, then the head last, so that I can get a good idea of what I want, before I'm locked into a size.

Thursday, October 25, 2012

Dolly update.

I have decided to go with an MSD sized doll.  I believe this will give me room to play with, and not make it so that I'm trying to sculpt a face the size of a marble.  Went and got the LA Doll clay yesterday, and am working on the sketches now.

I am using my current MSD for size reference, and determining about how long the limbs should be, as well as the size of the ball joints.  Also, since I like the way his head and body are proportioned to each other, I'll take that into consideration.

He is a hybrid, and seems to have a slightly different ratio than he did when he was a matched head/body combination.  But I love it. :)

Kit

Wednesday, October 24, 2012

Inspiration has been had!

Noting this down for myself...

Legs - Similar to Sileas' legs.  She has this absolutely awesome mobility joint just below her hips on each leg that I didn't realise were locking pieces that let her legs bend upward to nearly bring her knees to her chest.  Must work with this.  Also debating whether to add the upper arm mobility joint just below the shoulder, or just above the elbow.

Knee and elbow joints will have a slightly hollowed back on the upper parts.  Less 'realistic', when you look at it, but will allow for the full flexibility I want with this doll.

Feet -  Will need two sets cast.  Normal standing feet, and pointed toe feet.

Single jointed doll, however with a ridge at the elbow and knee to allow the joint to lock into place for half-bend and full bend.  This will likely be easier than trying to make it double jointed, but will still give the flexibility.

Body will be most definitely male, but with some softness and curves that you would find on a female doll.  Face will (hopefully) be androgynous.

Photo inspiration for this doll, and visual benchmarks for flexibility will be Karis Wilde.  Beautiful man, and one hell of a hula hoop dancer.  The doll will not be a 'Karis doll', but I'm going to be looking heavily at his build and musculature for reference.

I need graph paper.  Like NOW.
Kit

Making my doll.

Most people scour to find a BJD that fits the character they want.  I, however, have not been at all lucky in finding a doll to match one particular character of mine.  The body that would have worked was made by a company that went out of business.  I have yet to find a face that screams "I'M HIM!!", and so I find myself in the quandary of either ditching the idea completely, or making one from scratch for myself.

I'm not known as one who gives up.  SO...  I have decided to make the character into a doll myself.

I had been keen on the idea of making my own doll, but didn't know what to make.  My friend Lii and I bantered around ideas and I thought I had come up with a good plan.  Then I realised that I already have a character in my head who needs a form, and I would feel completely guilty if I didn't let him be realised before I go traipsing off into other ideas.

I also realise that it is 4am and I should be in bed, but this is generally when my ideas hit me.  My brain thinks it's grand fun to do this to me at least 2-3 times a week.

So today, once someplace nearby opens, I will be going to get graph paper and lots of caffeine.  I'm hoping to have the initial sketches done by tonight.  Who knows, maybe I'll even start the sculpting.  While I don't have enough clay currently to make the whole doll, I should have enough to at least get started.

Oh, and brain?  Can we please go to SLEEP now?
Kit

Tuesday, October 23, 2012

Glossary (Or: What do all those abbreviations mean??)

Hi again!

I know.  I just left.  But I'm back, to share some pearls of knowledge that I found helpful back when I didn't know squat about the hobby and felt too much like a nubcake to ask.  Let's start with terminology, and what it means.  You know... all those funky abbreviations, wig references, etc, that everyone in the hobby takes for granted, but forgets how annoying it was when we didn't know either.

Sizes

This was my big thing.  I kept seeing SD, MSD, YO-SD, Puki, Little, Mini, SD-13, SD-17...  I was expecting a micro at some point that was small enough to balance on your fingertip.  Here's the scoop on those sizes and what they mean:

SD - Your standard SD size reference is anything between 57cm and 65cm.  They were considered the largest dolls, but in recent years, larger ones have been showing up.  70cm is also common now, as are 73cm and 80cm.  If you go looking around, you can also find 105cm and even a lifesize BJD that stands 5'8" tall!  Sorry, I'm not having a doll that's taller than I am, it just kinda takes the Uncanny Valley and strip mines it.

SD 13 and SD 17 are just varying sizes of those, and are mainly used by the doll company Volks.  They are designed to look like young teens and older teens, respectively.  13's are on the shorter side, around 57-60cm, and 17's are closer to the 65cm mark.

MSD - This seems to be one of the more popular sizes.  MSD's are right around 45cm, give or take, and are a very convenient size if you like taking your dolls with you to conventions or other places.  Your SD's can get heavy after a bit... YO-SD's and smaller sometimes have parts that can get lost (magnetic hands, etc).

YO-SD - YO-SD's are the kids of the group.  They can range between 25cm and 29cm, and are generally used for child characters.  There are some exceptions to this rule, but I don't know enough about the Obitsu and Dollfie Dreams to really make a comparison.  There are adult-proportioned YO-SD's, but for the most part, they seem to be child based.

Then you get into the smaller ones.  Fairyland has a series of 'Puki' dolls that range from small to REALLY TINY.  Latidoll also has colour-coded dolls that can be really small in size.  I don't know the exact specs on those, as I don't own one, but trust me when I say they're small.  If you have a cat, they're toy-sized.


Wigs

This was the part that confused the bejeebus out of me when I got into the hobby.  You have a doll whose head is measured in centimetres, but the wigs are sized 4-5, 5-6, 6-7, 7-8, etc.  FINALLY someone explained it to me.  Doll wigs are sized in inches.  So...  you take your doll's head measurement (usually can be found on their order page, or you can measure their head from just above the ears), and either convert it to inches... or look at your tape measure.

If the doll's head is, say 8.4 inches, then you need a size 8-9 wig for them.  Because your measurement falls between 8 and 9 inches.  If your doll's site says their head is 24cm, then you'll need a 9-10, because that equals out to about 9.5 inches.

It's easy once you know what the heck you're looking for!


That's the main bulk of stuff that was confusing for me when I first started.  I'm sure I'll come up with more later... or feel free to ask!  If I don't know the answer, I'll find out!

Cheers,
Kit

First post! (AKA: I'm a wordy thing.)

Welp, I'm here...  >.>

That's saying a lot.  There's so much to say, and so little of it makes sense when it spews onto the keyboard. Makes perfect sense in my head though.

Let's start, shall we?  I am currently a 38 year old, who just got into the BJD hobby at the beginning of this year when I ordered my very first doll.  Granted, I'd wanted him for something like 4 years or so.

He is Youko, my DollZone Yuu-2 in normal yellow skin.  I paid out the nose for the fullset, only to find out that I hated his default outfit so much that he never wears it.  I adore his company faceup though.  He now has different clothes, and is beginning to take on the character he was meant for.  Youko is a kitsune, and therefore has fox ears and a tail.  Once I am able to do the colouring on his magnetic fox ears, he'll be complete.  He has silver hair, gold eyes, and silver fox ears and tail.

My second doll is still a floating head, but has a character in mind.  When I ordered Youko, DollZone was doing their spring event, so I got a free head.  I chose Tulip, also in normal yellow.  Originally, she was going to be a character doll for Retsu Unohana, from Bleach.  When she got here, however, I decided that it just wouldn't work, so the head sat there, waiting for an idea.  It wasn't until mid-summer that I decided to still make a character doll...  but male.  The Tulip head will now be Linneus, from the Teahouse online comic.  If you'd like to see, their website is www.teahousecomic.com but please be warned that it is a yaoi comic.  Linneus has pink hair and bright blue eyes.

My third doll happened by accident.  I was attending an online auction for BJD stuff, and someone had a Luts Winter Event 2009 head for sale.  I loved it, and bought it.  It will become Omi, an original idea character of mine, and I can't wait.  She has normal pink skin.  She and Linneus are both waiting on bodies.  Because I couldn't afford two more bodies from DZ and Luts at $400 apiece, I have ordered their bodies from Resinsoul and 5StarDoll, respectively, and I'm hoping they're here by Christmas.  Omi has black hair and I'm waiting to find the perfect pair of dark blue eyes.  Currently, she is wearing the gray eyes that Youko shipped with by default.

My fourth doll also happened by accident.  I was on Ebay, looking for bodies for Linn and Omi, when I stumbled onto an auction for an MSD DollZone Mo.  Since all of my dolls so far were SD sized, I thought what the heck, and got him.  Takai has quickly become my favourite, and I'm addicted to this sculpt.  I already have a line on another one for sale, in tan skin,  that will be paid off by mid-November.  Takai has taken on the character of Youko's younger brother...  he is also blind, as a character.  Takai has silver hair, blue/blind eyes (white pupil), as well as fox ears and tail that are black with white tips.

My fifth was Sileas.  I also found her on Ebay, and she is a Doll N Doll Miro, YO-SD sized in normal skin.  I think she's adorable, and she quickly became my Steampunk princess.   She is so easy to pose and work with, and so much fun to make clothes for, that I cannot wait for Omi's body to get here, so that I have a larger girl to sew for.  Sileas has green eyes and bright red, corkscrew curly hair.

My sixth was obtained from a private seller on Facebook, who was getting out of the hobby.  I had seen Resinsoul Long before, on the RS website... and I HATED him.  With the burning of a thousand suns.  I thought the sculpt was ugly.  It wasn't until I saw Tama on Facebook that I realised how much of Resinsoul's bad rap for dolls comes from the fact that their faceup artists and photographers don't know WTF they're doing.  Tama is beautiful, and poses so well, it's like a dream.  He has a custom faceup, and absolutely gorgeous dark tan/chocolate skin.  He has pale gold eyes and black hair.

I will be inundating you all with pics at some point.  I also will be posting pics of other stuff I do...  I love making clothes for my dolls.  I also love doing faceups on them myself, and making jewellery and accessories for them.  I am in the process currently of working on making my own BJD from scratch.  I'll be posting pics as the process moves onward.

So...  that's me in a nutshell.  Still here?  Good!

I'll see you again soon.  <3
Kit